1. 개요
시뮬레이션 구동 전 후에 따라 사용자는 원하는 분자들만 선택해야하는 경우가 있습니다. 예를 들어, 특정 residue만 추출한다던지, 특정 영역에 있는 원자들만 선택하는 등의 작업 등이 그것입니다. 이 문서에서는 GROMACS 기반 파일들의 특정 분자들만 선택해보는 방법들에 대해 알아보도록 하겠습니다.
주의 사항
2. gmx make_ndx?
다행히도, GROMACS 소스 코드에는 아주 친절한 기능이 포함되어 있습니다. 바로 인덱싱 기능입니다. 인덱싱을 활용하면, 보다 쉽게 시뮬레이션 시스템 내에 있는 분자들 중, 특정 분자 혹은 원자들만 선택할 수가 있습니다. 보다 상세한 설명은 아래 링크를 활용해주시기 바랍니다.
gmx make_ndx - GROMACS 2023 documentationmanual.gromacs.org실습을 위하여, 제가 준비한 임의의 .gro 파일을 다운로드 해주시기 바랍니다.
test.gro 720.0KB
해당 파일은 TIP4P 물 분자만으로 구성된 Hexagonal ice 구조입니다. 시각화하면 다음과 같습니다.
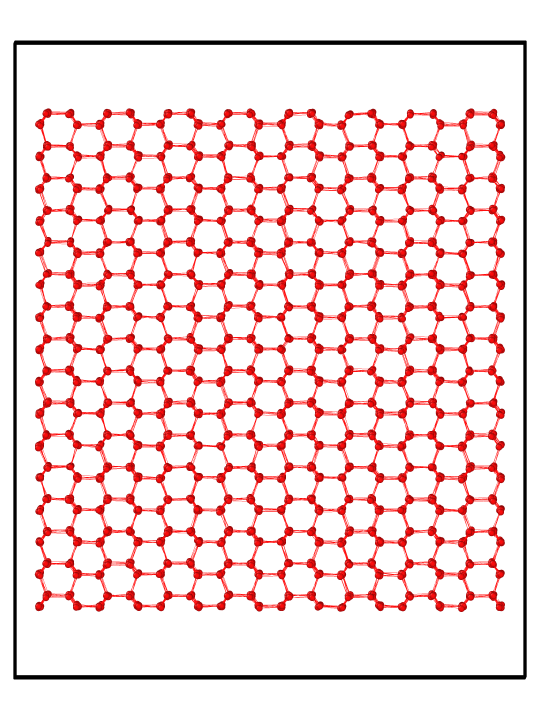
test.gro 시각화이 분자들 중, 특정 원자들만 선택하는 것이 가능합니다. OVITO나 VMD 중 원하시는 프로그램을 열어, 특정 물 분자 하나만 골라보도록 하겠습니다.
OVITO의 경우, Add modification - Selection - Manual selection 메뉴를 오픈하면 마우스 클릭으로 특정 원자만을 선택하는 것이 가능합니다.
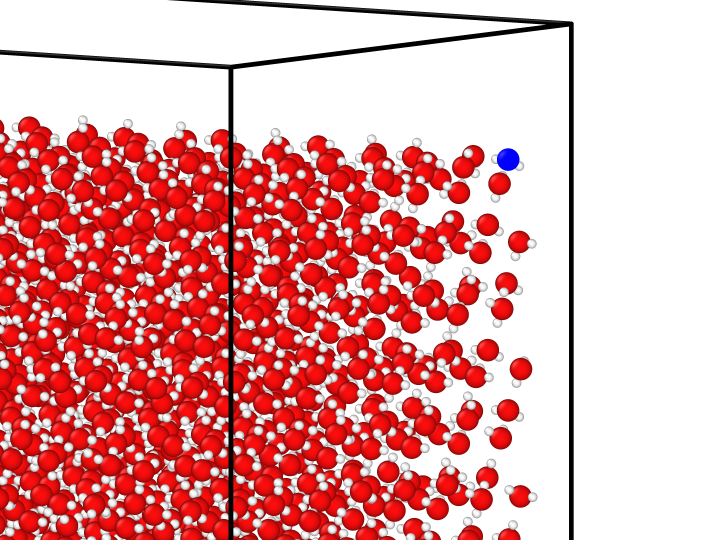
저는 우측 상단의 산소 원자 하나를 클릭하여 선택하였습니다.
오비토 내에서 정보를 확인하면 다음과 같습니다.

즉, Residue 번호 3088를 입력하면 해당 산소 원자가 포함된 물 분자 하나를,
Particle 번호 12349를 입력하면 해당 산소 원자만 선택하다는 얘기가 됩니다.
터미널에 다음과 같이 입력을 진행합니다.
gmx make_ndx -f test.gro -o 3088H2O.ndx이 커맨드는 make_ndx 를 실행하여, test.gro 파일을 불러오고, 3088H2O라는 이름의 인덱스 파일을 만듭니다.
이후, 다음과 같은 선택란이 나오며 유저에게 인풋을 입력하라고 요청합니다.
Reading structure file
Going to read 0 old index file(s)
Analysing residue names:
There are:  4096      Water residues

  0 System              : 16384 atoms
  1 Water               : 16384 atoms
  2 SOL                 : 16384 atoms

 nr : group      '!': not  'name' nr name   'splitch' nr    Enter: list groups
 'a': atom       '&': and  'del' nr         'splitres' nr   'l': list residues
 't': atom type  '|': or   'keep' nr        'splitat' nr    'h': help
 'r': residue              'res' nr         'chain' char
 "name": group             'case': case sensitive           'q': save and quit
 'ri': residue index

>
이제 저희가 찾아놓았던 residue number 3088를 입력해야 합니다.
> ri 3088residue index 3088를 입력하였습니다.
> ri 3088


  3 r_3088              :     4 atoms
TIP4P 물 분자 하나에는 4개의 원소가 있으므로, 정상 선택된 것으로 보여집니다. 이제 q를 입력하고 3088H2O.ndx 파일을 저장해줍니다.
이제 터미널에서 다음과 같이 입력해줍니다.
gmx trjconv -f test.gro -s test.gro -n 3088H2O.ndx -o selected_test.groeditconf 커맨드를 실행하여 기존 test.gro 좌표를 불러들이고, 3088H2O.ndx 인덱스 파일을 활용해 selected_test.gro 파일을 출력하는 커맨드입니다.
Select a group for output:
Group     0 (         System) has 16384 elements
Group     1 (          Water) has 16384 elements
Group     2 (            SOL) has 16384 elements
Group     3 (         r_3088) has     4 elements
Select a group:
이제 인덱스 파일에 저장했던 Group 3이 노출됩니다.
3 - Enter 를 순서대로 입력합니다.
다음과 같이 해당 물 분자만 선택이 완료되었음을 확인할 수 있습니다.
config2
    4
 3088SOL      O12349   5.824   3.500   6.868
 3088SOL      H12350   5.852   3.580   6.823
 3088SOL      H12351   5.728   3.504   6.865
 3088SOL      M12352   5.815   3.511   6.862
   6.20730   3.63850   7.72470
selected_test.gro 3. 특정 영역의 분자들만 선택하기
때로는, 시스템 박스 내 특정 영역의 분자들만 선택하고 싶을 때가 있습니다. 안타깝게도, GROMACS 코드 내부에는 이와 같은 기능을 하는 툴이 없습니다.
다행히도, 아래 깃허브 리포지토리에 유용한 코드가 있어 이를 사용하면 편하게 영역 내 특정 분자들의 선택이 가능해집니다.
gromacs-usecases/IceGrowth at d184850eb76b00783ab008b62b7463ad09649cd1 · vitroid/gromacs-usecasesUsecases for Gromacs. Contribute to vitroid/gromacs-usecases development by creating an account on GitHub.github.com리포지토리 내 코드들을 잘 들여다보면, 아래와 같은 코드들을 발췌할 수 있습니다.
import sys
from collections import defaultdict
import numpy as np

def read_gro(file):
    while True:
        frame = {"resi_id": [],
                "residue":  [],
                "atom":     [],
                "atom_id":  [],
                "position": []}

        title  = file.readline()
        if len(title) == 0:
            return
        n_atom = int(file.readline())
        for i in range(n_atom):
            line = file.readline()
            if len(line[0:5].strip()) > 5:
                residue_id = int(line[0:6].strip())
                residue    = line[6:11].strip()
                atom       = line[11:16].strip()
                atom_id    = int(line[16:21])
                x          = float(line[21:29])
                y          = float(line[29:37])
                z          = float(line[37:45])
            else:
                residue_id = int(line[0:5].strip())
                residue    = line[5:10].strip()
                atom       = line[10:15].strip()
                atom_id    = int(line[15:20])
                x          = float(line[20:28])
                y          = float(line[28:36])
                z          = float(line[36:44])

            frame["resi_id"].append(residue_id)
            frame["residue"].append(residue)
            frame["atom"].append(atom)
            frame["atom_id"].append(atom_id)
            frame["position"].append([x,y,z])

        cell = [float(x) for x in file.readline().split()]

        frame["resi_id"] = np.array(frame["resi_id"])
        frame["residue"] = np.array(frame["residue"])
        frame["atom"] = np.array(frame["atom"])
        frame["atom_id"] = np.array(frame["atom_id"])
        frame["position"] = np.array(frame["position"])

        if len(cell) == 3:
            cell = np.diag(cell)
        else:
            # v1(x) v2(y) v3(z) v1(y) v1(z) v2(x) v2(z) v3(x) v3(y)
            x = [cell[0], cell[5], cell[7]]
            y = [cell[3], cell[1], cell[8]]
            z = [cell[4], cell[6], cell[2]]
            cell = np.array([x,y,z])

        frame["cell"] = cell
yield frameread_gro.py#!/usr/bin/env python
# Source: https://github.com/vitroid/gromacs-usecases/blob/d184850eb76b00783ab008b62b7463ad09649cd1/IceGrowth/zfix.py
from read_gro import read_gro
import sys
import numpy as np
zmin, zmax = [float(x) for x in sys.argv[1:3]]
selected_molecules = set()
for frame in read_gro(sys.stdin):
for molecule in set(frame["resi_id"]):
molecule_atoms = frame["atom"][frame["resi_id"] == molecule]
molecule_positions = frame["position"][frame["resi_id"] == molecule]
if np.all((zmin <= molecule_positions[:, 2]) & (molecule_positions[:, 2] <= zmax)):
selected_molecules.add(molecule)
print("[FIX]")
s = ""
for i in range(len(frame["atom"])):
if frame["resi_id"][i] in selected_molecules:
s += f"{i+1} "
if len(s) > 72:
print(s)
s = ""
print(s)zfix.pyread_gro.py: 해당 코드는gro형식으로 된 분자 구조 파일을 읽어들여서 각 프레임의 정보를 파싱하여 딕셔너리 형태로 반환합니다.zfix.py: 해당 코드는read_gro.py모듈에서read_gro함수를 불러와서stdin에서 읽어들인gro형식 파일의 첫 번째 프레임을 분석하여zmin과zmax범위 내에 위치한 원자의 인덱스를 출력합니다.
위 두 코드를 test.gro 좌표 파일이 위치한 폴더에 모두 다운로드 받아주세요.
이후, 터미널에서 다음과 같이 코드를 실행시켜줍니다.
python3 zfix.py 3.0 4.0 < test.gro >> select1.ndx이 커맨드는 zfix.py 를 실행하여 z 범위 3.0 ~ 4.0 nm 사이에 있는 분자들을 선택하여 select1.ndx 라는 인덱스 파일로 저장시켜줍니다.
그 전에, test.gro 박스의 대략적인 크기를 알면 z = 3.0 ~ 4.0 nm이 어느 정도인지 대략적으로 확인해볼 수 있을 것입니다.
다음과 같은 코드를 같은 폴더에 저장해주세요.
import numpy as np
import matplotlib.pyplot as plt
from mpl_toolkits.mplot3d import Axes3D

# Read the box dimensions and atom positions from the gro file
with open("test.gro", "r") as grofile:
    lines = grofile.readlines()
    box_dimensions = np.array(lines[-1].split(), dtype=float)

print("Box dimensions: ({:.3f}, {:.3f}, {:.3f})".format(*box_dimensions))

# Visualize the box and atoms using matplotlib
fig = plt.figure()
ax = fig.add_subplot(111, projection='3d')
ax.set_xlim(0, box_dimensions[0])
ax.set_ylim(0, box_dimensions[1])
ax.set_zlim(0, box_dimensions[2])
ax.set_xlabel("X-axis [nm]")
ax.set_ylabel("Y-axis [nm]")
ax.set_zlabel("Z-axis [nm]")

ax.plot([0, 0, box_dimensions[0], box_dimensions[0], 0],
        [0, box_dimensions[1], box_dimensions[1], 0, 0],
        [0, 0, 0, 0, 0], color="black")
ax.plot([0, 0, box_dimensions[0], box_dimensions[0], 0],
        [0, box_dimensions[1], box_dimensions[1], 0, 0],
        [box_dimensions[2], box_dimensions[2], box_dimensions[2], box_dimensions[2], box_dimensions[2]], color="black")
ax.plot([0, 0, 0, 0, 0],
        [0, box_dimensions[1], box_dimensions[1], 0, 0],
        [0, 0, box_dimensions[2], box_dimensions[2], 0], color="black")
ax.plot([box_dimensions[0], box_dimensions[0], box_dimensions[0], box_dimensions[0], box_dimensions[0]],
        [0, box_dimensions[1], box_dimensions[1], 0, 0],
        [0, 0, box_dimensions[2], box_dimensions[2], 0], color="black")
plt.show()printboxsize.py그리고 다음과 같이 코드를 실행시켜줍니다.
python3 printboxsize.pyprintboxsize.py를 통해 자유롭게 마우스로 움직여볼 수 있는 시스템 박스 사이즈가 출력되고, 터미널에는 Box dimension이 출력되어 박스의 크기를 확인해볼 수 있습니다.
Box dimensions: (6.207, 3.639, 7.725)이제 z = 3.0 ~ 4.0 범위의 물 분자만을 선택해보겠습니다.
gmx trjconv -f test.gro -s test.gro -n select1.ndx -o select1.gro다음과 같은 결과 창이 출력됩니다.
Select group for output
Group     0 (            FIX) has  2422 elements
There is one group in the index
Reading frames from gro file 'config2', 16384 atoms.
Reading frame       0 time    0.000
Precision of test.gro is 0.001 (nm)
Last frame          0 time    0.000
OVITO로 확인해보니, 다음과 같이 선택된 분자들만 포함되어 있음을 알 수 있습니다.
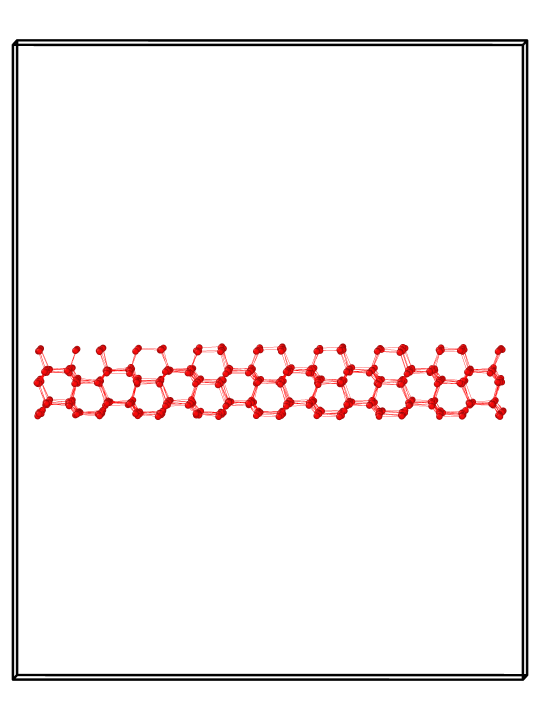
select1.gro)특정 z 범위 내의 분자들만 선택하는 방법에 대해서 알아보았습니다.
그렇다면 x, y, z 영역을 특정하는 것도 가능할까요? (x0 ~ x1, y0 ~ y1, z0 ~ z1 사이의 분자들만 추출)
zfix.py를 복사하고, rectangularfix.py라고 이름을 변경합시다.
다음과 같이 내용을 변경해줍니다.
from read_gro import read_gro
import sys
import numpy as np

xmin, xmax, ymin, ymax, zmin, zmax = [float(x) for x in sys.argv[1:7]]

selected_molecules = set()

for frame in read_gro(sys.stdin):
    for molecule in set(frame["resi_id"]):
        molecule_atoms = frame["atom"][frame["resi_id"] == molecule]
        molecule_positions = frame["position"][frame["resi_id"] == molecule]
        if np.any((xmin <= molecule_positions[:, 0]) & (molecule_positions[:, 0] <= xmax) &
                  (ymin <= molecule_positions[:, 1]) & (molecule_positions[:, 1] <= ymax) &
                  (zmin <= molecule_positions[:, 2]) & (molecule_positions[:, 2] <= zmax)):
            selected_molecules.add(molecule)

print("[FIX2]")
s = ""
for i in range(len(frame["atom"])):
    if frame["resi_id"][i] in selected_molecules:
        s += f"{i+1}  "
        if len(s) > 72:
            print(s)
            s = ""
print(s)rectangularfix.py이번에는 x, y, z 모든 영역 범위를 입력해주어야 합니다. 다음과 같이 말이죠.
python3 rectangularfix.py 1 3 1 3 1 2 < test.gro >> select2.ndx- x 범위: 1 ~ 3 nm
- y 범위: 1 ~ 3 nm
- z 범위: 1 ~ 2 nm
성공적으로 추출된다면, 작은 박스 형태로 분자들이 선택될 것입니다.
trjconv 커맨드를 사용하여 추출을 진행합니다 .
gmx trjconv -f test.gro -s test.gro -n select2.ndx -o select2.gro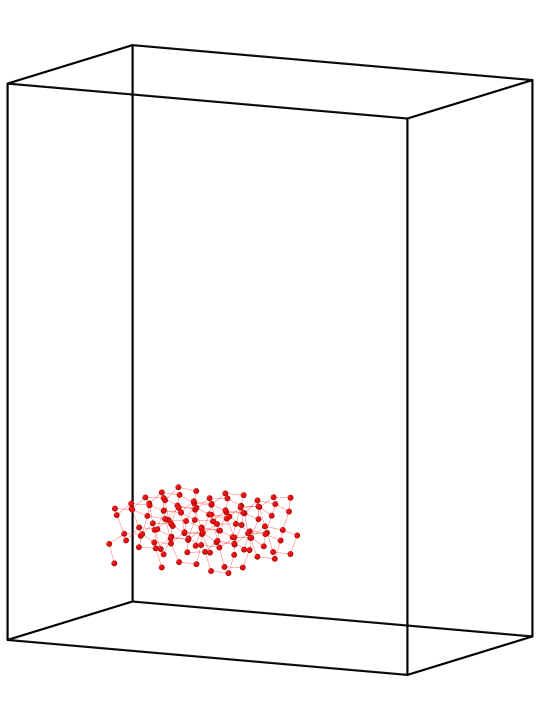
select2.gro위와 같이 1 3 1 3 1 2 범위 내의 분자들만 sorting 된 것을 확인할 수 있습니다.
💡 Box region 바깥 부분의 분자들만 선택해야 한다면?
아주 특수한 케이스지만, 선택 영역 바깥 부분의 분자들만 남기고 싶은 경우가 있습니다. 슬래브 모양의 빈 공간을 분자들 사이에 내고 싶을 때 (hollowed-shaped)가 바로 그런 상황이겠죠. 이럴 때에는 다음과 같이 ex_src.py 라는 파일을 작성하여 사용하면 됩니다.
# ex_src.py
from read_gro import read_gro
import sys
import numpy as np

xmin, xmax, ymin, ymax, zmin, zmax = [float(x) for x in sys.argv[1:7]]

selected_molecules = set()

for frame in read_gro(sys.stdin):
    for molecule in set(frame["resi_id"]):
        molecule_atoms = frame["atom"][frame["resi_id"] == molecule]
        molecule_positions = frame["position"][frame["resi_id"] == molecule]
        if np.any((molecule_positions[:, 0] < xmin) | (molecule_positions[:, 0] > xmax) |
                  (molecule_positions[:, 1] < ymin) | (molecule_positions[:, 1] > ymax) |
                  (molecule_positions[:, 2] < zmin) | (molecule_positions[:, 2] > zmax)):
            selected_molecules.add(molecule)

print("[SELECT]")
s = ""
for i in range(len(frame["atom"])):
    if frame["resi_id"][i] in selected_molecules:
        s += f"{i+1}  "
        if len(s) > 72:
            print(s)
            s = ""
print(s)ex_src.py사용 방법은 똑같습니다.
python3 rectangularfix.py 1 3 1 3 1 2 < test.gro >> select2.ndx하지만 이번에는 선택된 분자들이 지정 영역 바깥 부분이 되겠군요.
마지막으로, 구 (sphere) 형태로 분자들을 선택해보겠습니다.
다음과 같이 sphericalfix.py를 저장해주세요.
# Debug completed! 2023-02-24

from read_gro import read_gro
import sys
import numpy as np

x0, y0, z0, r = [float(x) for x in sys.argv[1:5]]

selected_molecules = set()

for frame in read_gro(sys.stdin):
    molecule_positions = frame["position"]
    dx = molecule_positions[:, 0] - x0
    dy = molecule_positions[:, 1] - y0
    dz = molecule_positions[:, 2] - z0
    dist = np.linalg.norm(np.column_stack((dx, dy, dz)), axis=1)
    inside_sphere = np.where(dist <= r)[0]
    selected_molecules = selected_molecules.union(set(frame["resi_id"][inside_sphere]))
    outside_sphere = np.where(dist > r)[0]
    frame["resi_id"][outside_sphere] = -1

    # Find the molecules are located in the boundary of the sphere and remove them from the selection
    ## I'm going to set the cutoff as 0.27 nm, since I'm using the water molecules
    boundary = np.where((dist > r-0.135) & (dist < r+0.135))[0]
    boundary_molecules = set(frame["resi_id"][boundary])
    selected_molecules = selected_molecules.difference(boundary_molecules)

print("[SPHERE]")
s = ""
for i in range(len(frame["atom"])):
    if frame["resi_id"][i] in selected_molecules:
        s += f"{i+1}  "
        if len(s) > 72:
            print(s)
            s = ""
print(s)sphericalfix.py커맨드에는 다음을 입력합니다.
python3 sphericalfix.py 3 2 3 2.0 < test.gro >> select3.ndx구심점이 (3, 2, 3)이고 radius = 2.0 인 구 안에 포함된 모든 분자들을 선택할 수 있습니다.
gmx trjconv -f test.gro -s test.gro -n select3.ndx -o select3.gro이제 gmx editconf를 실행하면 select3.gro 파일을 얻을 수 있습니다.
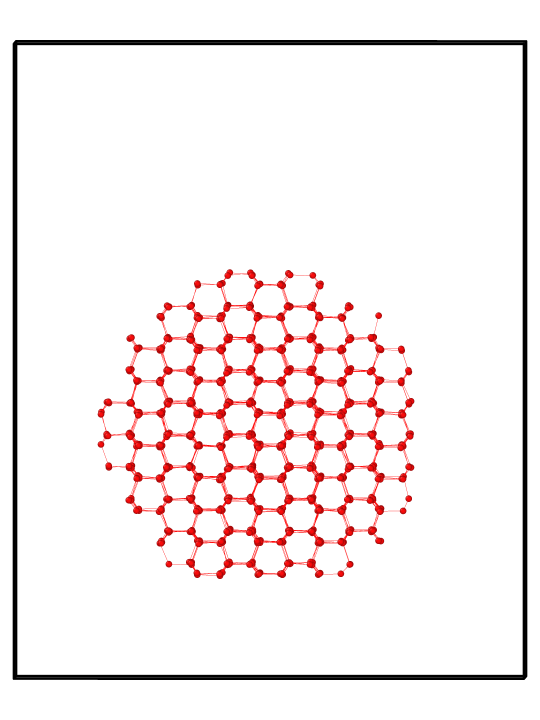
4. 마치며
분자 선택을 잘하면 원하는 형태의 시스템 디자인이 얼마든지 가능해집니다.
위 실습을 통해 충분한 분자 선택 연습을 하시고, 본인만의 시스템을 구현해보세요!
◻️